Decoding ASTM A388: What "Capable Of" Really Means for Your Forged Parts
What You'll Learn:
- Limitations of the "capable of ASTM A388" claim
- Importance of verified ultrasonic testing for forgings
- Risks associated with hidden internal defects in forgings
- Challenges of ultrasonic testing on "as forged" vs. prepared surfaces
- Downstream impact of defects on CNC machining
- Why documented nondestructive testing proof is crucial for critical parts
In industries where safety and precision are non-negotiable, ensuring the structural integrity of metal parts is critical. Ultrasonic testing, a powerful non-destructive evaluation method, plays a crucial role in detecting hidden flaws. But what does it really mean when a manufacturer claims that a component is "capable of ASTM A388"? This label suggests that the part theoretically meets stringent ultrasonic testing standards—but it doesn't guarantee it has undergone actual testing. The distinction could make all the difference when lives and reliability are on the line.
What "Capable of ASTM A388" Means (and Doesn't Mean)
When a forger states that a part is "capable of ASTM A388," it means the part should theoretically meet the ultrasonic testing standards outlined in ASTM A388/A388M—Standard Practice for Ultrasonic Examination of Steel Forgings. However, this does not mean the part has actually been tested, only that the manufacturer believes it could pass if tested.
Why Verified Ultrasonic Testing is Crucial for Critical Forged Components
While a general assurance of quality might suffice for forged parts that are used in low-requirement applications, it's not acceptable for components destined for high-performance, high-stress, high-temperature environments in critical applications where structural integrity is paramount. In these demanding conditions, even small internal defects—such as non-metallic inclusions, porosity, or cracks—can weaken the structure and lead to failure.
This has led some Original Equipment Manufacturers (OEMs) to require documented proof of non-destructive testing (NDT) from forgers to verify the soundness of a part. Ultrasonic testing (UT), as defined by ASTM A388, is one of the most frequently used NDT methods for detecting internal defects in forged components. However, this is not as straightforward as it seems. One key challenge is that many parts are delivered in a rough "as forged" condition, making them incapable of being tested due to surface irregularities and scale.
"For critical applications, it is essential that the customer only receive forgings of proven soundness. That may not be essential if the part is going into equipment where stress levels are low. However, if the forged part operates in an environment where high stress forces, extreme heat, intense cold, or corrosive exposure, undetected internal defects can lead to failure," says Jeff Klein, Director of Sales for All Metals & Forge Group (AMFG).
All Metals & Forge Group (AMFG) is an ISO 9001:2015 and AS9100D manufacturer of custom and standard open die forged parts and seamless rolled rings that meet industry specifications such as ASTM, AMS, AISI, ASME, SAE, DIN, ASME B 16.5, ASME B16.47, and API 6A.
Identifying Hidden Threats: Common Internal Defects in Forgings
Internal defects in forged steel are not visible on the surface. They can originate from two primary sources: material defects from the casting process and defects that develop during forging or heat treatment.
During smelting and casting, non-metallic inclusions result when slag, oxides, sulfides, or silicates become trapped in the metal during smelting. Porosity and voids in steel forgings are commonly caused by shrinkage or gas entrapment during solidification, while segregation of alloying elements can create areas of structural weakness within the ingot. The prevalence of casting defects depends on the material composition, smelting process parameters, and the quality control measures in place. Most forging methods of the hot-worked metal eliminate the voids as the material is compressed and reformed.
In contrast, forging and heat treatment defects arise later in the process. These include forging laps and folds, which occur when metal folds over itself but does not properly bond; internal cracking due to improper strain rates or thermal stress; and quenching cracks, which develop when rapid cooling creates internal fractures.
These defects cannot be detected visually and cannot be removed after forging is complete. The only way to ensure internal soundness is through non-destructive testing, such as ultrasonic testing.
"Defects may lead to reduced mechanical strength, increased susceptibility to fatigue, and potential failure under stress," explains Klein. "This is why meeting or exceeding the ASTM standard with actual testing is increasingly important for critical forgings."
How Ultrasonic Testing (UT) Uncovers Internal Flaws
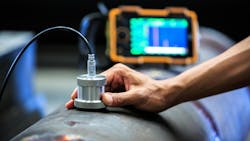
To detect and evaluate voids, ultrasonic testing is commonly employed. This nondestructive method involves transmitting high-frequency sound waves into the material and analyzing the reflected signals to identify internal discontinuities.
The Risks of Skipping UT: Cost Savings vs. Structural Integrity
The absence of ultrasonic testing does not necessarily indicate the presence of voids or defects in the part. However, instead of conducting actual testing, forgers often provide assurances that the part is "capable of ASTM A388" for various reasons, one primary being to reduce overall costs.
Challenges in Ultrasonic Testing: The "As Forged" Condition
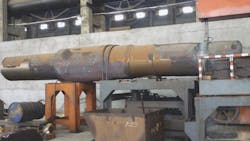
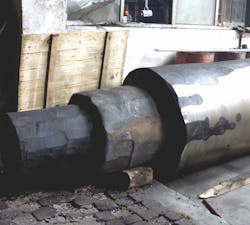
In addition to eliminating the costs associated with in-house or third-party ultrasonic testing, many parts are delivered in an "as forged" condition, with a scaly, blackened decarburized surface layer. This reduces the cost of the part. However, the "as forged" part is not capable of being ultrasonically tested, making soundness verification impossible until a surface layer is properly removed.
Surface Preparation: The Key to Accurate Ultrasonic Testing
Removing this surface layer is not just about aesthetics or enabling UT testing—it's crucial for the long-term integrity of the part. During forging, the outer layer of the metal is exposed to high temperatures and oxidation, which depletes essential elements like carbon. This makes the surface layer weaker and more brittle than the rest of the part.
Additionally, this oxidized surface often contains microcracks that are invisible to the human eye. If left unremoved, these microcracks can propagate and develop into serious cracks during heat treatment or service, leading to unexpected failures.
At AMFG, almost all forged components undergo surface machining to remove this compromised layer, preventing unnecessary risks in later processing and use.
Klein explains that even removing scale to reach a 500 RMS (root mean square) surface finish remains too rough for proper UT. A 250 RMS surface finish is required for UT because it directly affects the contact ability of ultrasonic equipment that transmits waves into the part and reflects from the material. A rough surface does not allow proper contact. Increased surface roughness can scatter and weaken these waves, reducing signal strength and making it more difficult to detect internal defects accurately. It can also lead to a lower signal-to-noise ratio, complicating the interpretation of results.
Beyond the Standard: Ensuring Forging Quality with Rigorous UT Protocols
Klein says that AMFG follows a comprehensive process to ensure high-quality forgings from start to finish. This includes thorough testing for inclusions and flat-bottom holes. After each piece is forged using hammers or ring rollers, the part is cleaned up by rough machining to achieve a 250 RMS surface. All forged components are then subjected to UT testing at no additional cost, with any defective parts being removed to ensure only approved parts are delivered to customers.
Given the importance of assuring quality in forgings, AMFG certifies parts to a stricter standard than outlined in ASTM A388. "While ASTM A388 only defines ultrasonic back reflection loss as a measure of defect presence, it does not specify a fixed acceptable defect size. Our UT acceptance starts at 1/8" flat-bottom hole (FBH) equivalent, which is more demanding than many standard criteria. For customers requiring even higher quality, AMFG can apply stricter acceptance levels as needed. Although zero-defect is always the goal," says Klein.
The Downstream Impact: How Internal Defects Affect CNC Machining
Klein emphasizes another critical reason to require documented proof that ultrasonic testing was conducted, and that the part is internally sound, is that defects within forged parts can pose significant challenges during CNC machining. Defects act as stress concentrators, potentially leading to structural weaknesses in the final component. This compromise can result in reduced performance, or even failure, under operational stress.
Discovering a defect during machining often necessitates scrapping the affected part, leading to material wastage and additional costs associated with replacement. It can also cause unexpected tool deflection or breakage, posing a risk to both the CNC machine and the operator.
For more information, contact All Metals & Forge, LLC at 75 Lane Road, NJ 07004; (973) 276-5000; Canada (416) 363-2244, toll-free (800) 600-9290; fax (973) 276-5050, or visit steelforge.com.
About the Author

Del Williams
Del Williams is a technical writer based in Torrance, California. He writes about health, business, technology, and educational issues and has an M.A. in English from C.S.U. Dominguez Hills.


