Efficient uses of resources, cost saving, and process optimization are critical competitive factors in modern business. In the metal forming industry, this means an ever-increasing pressure of competition that forces the manufacturers to adopt processes that lower the costs of production [Ste09]. The opportunities for this lie in reducing material usage during forging and in reducing production time.
Flashless precision forging achieves both of these. Since flashing doesn’t occur, the requisite amount of raw material is reduced. In addition, due to the near-net-shape production extensive finishing can be omitted [Kud90, Mat90, Mue09]. Frequently, forged parts with cavities, holes or apertures are warm punched and in many cases simultaneously de-flashed in a second process step following the forming process. This second process step extends the processing and handling time as well as the costs of production, because an additional tool is required for the punching process. By using a combined forming and punching process, parts can be “flashlessly” formed and punched in a single step. The result is a decrease in handling time and lower production costs, since an additional tool is not required. Using the combined forming and punching process, high grades of surface quality can be achieved in the parts through holes, thus superseding additional finishing steps. The combined forming and punching process is applicable to rotation-symmetric parts as well as parts with a distinct longitudinal axis.
Tool design and process flow
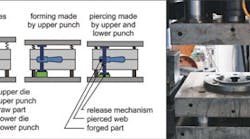
The tool concept for the combined flashless forming and punching process was developed for rotation-symmetric parts [Beh06] at the Institut fr Integrierte Produktion Hannover GmbH (within the scope of a research project funded by DFG, “Studies on combined shaping and punching (processes)” (RE 2207/8-2). In a subsequent research project (BE 1691/77-3) the concept was adapted for parts with a longitudinal axis. The tool consists of an upper die, an upper punch (which combines forming and punching), gas-filled springs, a lower die, a lower punch, and a release mechanism (see Figure 1). The material for the tools was specified as 1.2365; for the parts, 1.7131 was used.
During closure of the upper and the lower die a first, flashless metal forming operation is performed. Subsequently, the upper punch starts moving while the lower punch still remains in its position. Gas-filled spring devices keep the gravure closed.
As soon as the die cavity is filled, the inner die pressure increases rapidly. As soon as the default force for the lower punch is exceeded, a downward movement of the punch is activated by a release mechanism. The residual material that remains at the cross-sectional area of the upper punch, the web, is pushed downward by the upper punch, which moves until the workpiece is completely pierced. During this operation the web is not broadened by the two punches. The part is completed. During the upstroke of the ram, the springs release tension and keep the upper die and the forging part in position, while the upper punch is lifted and pulled out of the forged part. Only when it has reached its initial position relative to the upper die, the dies open up and the workpiece can be removed. At the same time it must be ensured that the lower punch remains in position until the gravure is opened and the workpiece removed so that the web cannot be pushed back into the forged part [Mey05].
The release mechanism ensures the mold filling of the gravure. It releases the lower punch at a force that is specified by the enlarging of the inner pressure in the die after the mold filling of the gravure. It consists of two cutters and a variable amount of pins that are sheared by the cutters.
Test Evaluation
Simulation — The design process of the forging sequence was facilitated by material-flow simulation programs working on a FEA (Finite Element Analysis) basis. The general applicability of the method for long parts could be verified. Based on the deformation degree of the workpiece and the stress occurrence inside the tool, the simulations were analyzed. The results were used to redesign the tools and the workpiece. If the dies close without forming, the tools cannot absorb the stress that occurs during the punching and forming process. During the forming process stresses between 1,540 and 3,500 N/mm2 occur at the head area. They exceed the yield strength of the tool-steel (Rp0.2 = 790 N/mm2) and thus make a forming process solely performed by the punch not feasible. In order to reduce stress occurrence the closure of the dies starts the flashless metal forming operation.
This operation decreases the occurring stresses significantly. The stresses drop to a maximum of 520 N/mm2 while the upper punch moves downward and finishes the forming and piercing process. During the movement of the punch, the gas-filled springs keep the upper and the lower die in position.
Wear of the forming and piercing punches is predominantly determined by the thermo-mechanical stress. This stress can be reduced by a modification of the punch geometry, e.g., the cutting edge or the front surface. Herold investigated the influence of a design change of the cutting edge for sheet metal processing and found a big impact on the wear behavior and product quality [Her03]. There is a big difference between the behavior of sheet metal processing and hot bulk forming so that only very few findings could be adapted to the process described within this paper. In order to examine wear behavior and influence upon the punching surface, the combined process was simulated with different punch geometries. Based on the stress and different forces occurring during the forming process four punch geometries were selected for subsequent forging tests (see Figure 2.)
Practical Tests — Test forgings were conducted to verify the simulation findings. On the basis of experiences gained in tests with rotation-symmetric parts, the following parameters were defined for the test forgings:
• Temperature of workpiece 1200 °C
• Heating of workpieces in annealing coal to prevent scaling
• Tool coated with TiB
• Lubrication with graphite-water mixture.
An 11,000-kN friction press by Mller-Weingarten was used for the forging tests. To make the test conditions comparable to those in the simulation, heating cartridges and heating oil were used to heat up the tool to a temperature of 110°C. The temperature was monitored by a pyrometer and a thermographic camera. In order to release the lower punch at the given time for every test run the release mechanism was equipped with the number of pins calculated previously. The resulting forces found in the simulations were used to determine the amount of pins required. In addition, during the test forgings the punching die was exchanged to analyze the influences of different punching die geometries upon the punching surface and the wear behavior. Every punching die geometry was used to produce a lot size of n = 15 components for statistical evaluation.
A combination of different tests was performed with the forged parts to prove the feasibility of the newly developed process combination. The forged parts were assayed regarding dimensional accuracy, scallop height and fiber orientation. The forged parts were surveyed on a Stiefelmayer 3D coordinate measuring machine. The diameters achieved in the upper area of the punch are within a tolerance range of 0.1 mm. The target value was 30 mm and the average through-hole diameter measured was 29.65 mm.
There is a notable reduction in diameter within the shearing area compared to the round-bodied shape seen on rotation-symmetric parts. The reasons for this are the varied alignment of the fiber orientation within the shearing area because of the fiber orientation of the raw parts. The fiber orientation in raw parts for rotation symmetric components runs parallel to the punching die’s direction of movement. Tearing of the material at the end of the punching process is not hindered by the fibers. The raw parts for components with a distinct longitudinal axis feature a fiber orientation that runs vertical to the punching die’s direction of movement. In this way when the component is punched the fibers are roped into the shearing area and the material spreads around the punching die. The punching die has to cut through the fibers. The result is a reduced diameter in the shearing range of the punching. The tearing or lack of tearing, respectively, are visible in Figure 3 and have been confirmed by FEA-simulations.
The roughness measurements within the punching were performed with the mobile perthometer T1000 and the linear feed device LV 15, manufactured by Hommel-Etamic. The measurements of surface roughness in direction of shaping registered comparable results for both component-types. Figure 4 shows the roughness values for components with a distinct longitudinal axis in a box plot-diagram covering top and bottom quartile, median value, maximum, and minimum values. Roughness measures (Rz) of 1.48 and 12.63 ∝m constitute the minimum and maximum value found: 50% of the measured values range around Rz 2.44 to 7.84 ∝m with a median of 3.24 to 6.41 ∝m. The medium roughness (Ra) was measured at 0.18 (minimum) and 2.13 ∝m (maximum); 50% of the measuring results were found to be within the range of Ra 0.31 to 1.13 ∝m with a median of Ra 0.39 to 0.78 ∝m. Milling as a manufacturing method is specified [DIN4766-1, DIN4766-2] with values of Rz 10 to 63 ∝m and Ra 1.6 to 12.5 ∝m. Due to the low roughness values, which result in high surface-quality pre-finished surfaces can be realized for both component-types. The findings show no significant influence of punch geometry upon the quality of the through hole surface.
Outlook
Within the scope of the completed research projects aided by the DFG the feasibility of a combined forming and punching process for near-net-shaped forged parts was demonstrated successfully. In addition, the parts’ applicability without any further processing of the punching could be proved. The studies were conducted with only one punch. Due to the complex nature of existing part geometries (e.g. axle stubs) the method should be expanded to include multiple punches.
By using several punches the forming of the parts while the dies are closed can be replaced by a forming process conducted solely by the forming and punching-dies. An additional opportunity for further research is the serial operation of the tool concept, e.g., a study of the tool’s industrial application spectrum for fast-moving horizontal presses. Currently, many parts like beads or pinions are produced on fast-moving horizontal presses. For this kind of industrial process 100 passes per minute would be a realistic working hypothesis. The tool concept should be modified with regard to the applicability for horizontal presses.
Dipl.-Ing. (FH) Judith Kerkeling, Dipl.-Wirt.-Ing. Karsten Müller, and Dr.-Ing. Dipl.-Oec. Rouven Nickel are affiliated with the Institut für Integrierte Produktion Hannover gGmbH, in Hanover, Germany; visit www.iph-hannover.de . The authors thank the German Research Foundation for its financial support of the project.
| References [Kud90] Kudo, H.: Towards Net Shape Forming. In: Journal of Materials Processing Technology, Bd. 22 (1990), S. 307/342. [Mat90] Matsushita, T.: Improvement for Closed-Tolerance Forging and Extrusion in Japan. In: Journal of Materials Processing Technology, Bd. 22 (1990) 3, S. 223/238. [Mue09] Mller, S.: Prziseres Schmieden mit 100% Materialeffizienz. In: Intelligenter Produzieren, VDMA Verlag GmbH, o. Jg. (2009), H. 5, S. 32-33. [Beh06] Behrens, B.-A.; Meyer, E.; Reinsch, S.; Schott A.: Combined Forging and Through Hole Piercing. In: WGP Annalen, Carl Hanser Verlag, Vol. 13 (2006), No. 2, p. 87. [Her03] Herold, J.: Einfluss der Kantengestaltung von Schneidstempeln beim Scherschneiden auf die Stempelstandzeit, www.utfscience.de, II/2003 (2003). [DIN4766-1] DIN 4766-1, Ausgabe:1981-03 “Herstellverfahren der Rauheit von Oberflchen; Erreichbare gemittelte Rauhtiefe Rz nach DIN 4768 Teil 1.” [DIN4766-2] DIN 4766-2, Ausgabe:1981-03 “Herstellverfahren der Rauheit von Oberflchen; Erreichbare Mittenrauhwerte Ra nach DIN 4768 Teil 1.” |
