How To Install and Integrate a Standalone Chiller
When considering a liquid chiller system, precision and accuracy are critical for the temperature control of the application. Innovative cooling equipment is essential to regulate temperatures to ensure effective control. Find out how to select the best liquid chiller system for a given application by following the important steps laid out here.
Calculate System Size
Correct selection and sizing of the liquid chiller system for a given application can make a significant difference in reducing startup waste, achieving higher-quality applications, increasing product output, and improving profitability. Calculating the size of the liquid chiller system using correct application details is critical to achieving accurate process cooling with a liquid chiller.
Users should never assume that an existing installation with comparable application details has been effectively sized. Sizing parameters should be determined by performing a thorough calculation of the process load conditions to ensure the correct cooling and pump capacities are selected. It is essential to understand that the cooling loads will fluctuate depending on the materials used and the complexity of the manufacturing. Therefore, the size or capacity of a liquid chiller system must be designed to accommodate the varying workloads and ambient conditions that affect the system.
Typical sizing questions required for accuracy include equipment ambient conditions, type, and size of equipment to be cooled, process temperature required, inlet/outlet quantity and size of lines, liquid medium, and control requirements. These will all influence the end cooling result.
Performing Sizing Calculations
The three main factors for sizing are:
- Incoming water temperature (°F) (also known as processed water temperature),
- Required chilled water temperature (°F) (also known as the setpoint of the chiller), and
- Flow rate (measured in gallons per minute, or GPM).
Step 1: Calculating the System Water Temperature Change (F°)
Incoming Water Temperature (°F) - Required Chilled Water Temperature (°F)
Measure the water temperature of the water inlet line and subtract the required chilled water temperature to calculate the system water temperature change.
Step 2: Calculating the Rate of Flow in Gallons per Minute (GPM)
To measure the flow rate of the water, place a flow meter on the outlet line of your equipment. If one is not available, simply measure the time it takes for the outlet flow to fill a five-gallon bucket, and then compute your gallons per minute (GPM) of flow.
Step 3: Calculate the Cooling Capacity Needed
General chiller sizing formula:
BTU/HR (Cooling Capacity) = 500 (Thermodynamic Constant for water-based solutions) x Flow Rate (GPM) x System Water Temperature Change (°F)
For example: 500 x 10.0 GPM x 12°F = 60,000 BTU/HR of cooling capacity needed.
Step 4: Calculation of Safety Factor and Derating Conditions
You should always include a safety factor to allow for unknown or unexpected conditions. The size of the factor can also be dependent on the accuracy of the wattage calculation. The smaller the system, with fewer variables and outside influences, the smaller the safety factor. The larger the system, with greater variables and outside influences, the greater the safety factor.
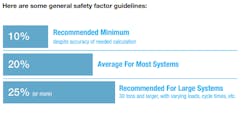
Here are some general safety factor guidelines:
- 10% safety factor is the recommended minimum despite the accuracy of the needed calculation;
- 20% is the average for most systems; and
- 25% or more is recommended for large systems (30 tons and larger) with varying loads, cycle times, etc.
Derating the capacity can be a complicated calculation including the ambient environmental conditions, process temperature required, flow rate and size of lines, liquid medium, length/complexity of the plumbing from application to chiller, and control requirements. These will all influence the end cooling result and can vary depending on the model of chiller selected for your application.
Understanding the Liquid Medium
Control accuracy of the liquid set point within fractions of a degree is possible with the correct system. Pfannenberg offers compact and energy-efficient designs that allow for control of processes in limited spaces and reduced operating costs.
Cooling processes can be handled with any one of three different mediums: water, water/glycol, or heat transfer oil. Which fluid type is selected depends on the temperature the system must achieve, cooling loads, and process requirements like flow capabilities, cycle times, material, etc.
In cases where pure water is not a usable medium for the application, glycol, and heat transfer oil can be utilized partially to create a water-based emulsion. Cooling capacity correction factors must be made if glycol or heat transfer oil will be utilized.
Determine Appropriate Controls
Liquid cooling demands accuracy and reliability for temperature stabilization, while operators need easy-to-use and highly visible controls and indicating lights.
Pfannenberg chillers offer microprocessor-based controls that provide control performance, visibility to operators, and are configurable to meet specific application needs. A variety of control features including flow/pressure alarms, ambient temperature alarms, and remote communication options are available to ensure optimal and desired results.
Plan System Installation Carefully
Plan to install a new chiller system in an area that provides adequate space and ventilation, for indoor installation, or has adequate features, for outdoor installation (i.e. concrete pad, environmental coverings, etc.). Understanding the environment, the chiller will be placed in, as well as the length and size of the plumbing run, can drastically affect the overall performance of a chiller as well as disqualify it from use.
High ambient and/or outdoor applications, caustic and washdown environments, and electrical voltage issues are some examples of these conditions. Before installing or starting up any liquid chiller system, first read the manufacturer’s instruction manual and follow their installation/startup procedures carefully and complete an inspection of all electrical and mechanical components of the system.
Prolong the Life of Your Liquid Chiller System
Preventive maintenance procedures should regularly be performed to keep the liquid chiller system clean and well-maintained. Performing weekly, monthly, and quarterly checks will extend the life of a chiller system. Refer to the procedures provided in the manufacturer’s instruction manual.
By following some basic guidelines before, during, and after installation, users can extend the chiller lifespan, avoid mechanical/electrical problems, and ensure that a liquid chiller system will provide a high level of efficiency and reliability throughout its lifetime.
