Flashless Forging of a Two-Cylinder Crankshaft with Secondary Form Elements
Figure 7: Comparison of tool wear.
In recent years flashless precision forging of two-cylinder crankshafts was developed at the IPH - Institut für Integrierte Produktion Hannover gemeinntzige GmbH. Compared to conventional forging methods, flashless precision forging permits reduction of raw material required to complete the part, as well as the omission of the process steps for trimming. Due to the improved quality of the finished parts, flashless forging makes it possible to achieve functional surfaces without extensive additional reworking.
To assess the industrial applicability of this forging method, IPH is researching the technology for precision forging a challenging crankshaft, including the secondary form elements, low end and flange. This report describes the design of the forging sequence and process. The goal of the research is a three-stage forging sequence for flashless precision forging of crankshafts with secondary form elements.
Flashless precision forging is conducted in closed dies. With the method described here, die closure is realized temporally separated from the forming. There is no forming until die closure. Only the subsequently inserted punch initiates the forming.
Precision forging reaches quality levels like tolerance classes IT 8 to IT 10 [Doe07, Bro99]. A four-stage forging sequence of a simplified two-cylinder crankshaft without any secondary form elements is depicted in Figure 1. This sequence was developed in the special Figure 1: Stage sequence for flashless precision forging of a two-cylinder crankshaft without secondary form elements [Mue08].research project, SFB 489.
The first and second forming step is done by lateral extrusion in a closed die. The third step consists of multi-directional forming in a semi-open die, and the fourth (and final) step is a flashless precision forging process, again in a closed die. During the multi-directional forming step, the part is formed in vertical and horizontal spatial direction. The redirection of press energy was realized by wedges [Mue08].
Present development
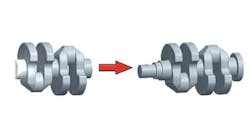
To use the precision forging technology for crankshafts in industrial operations, it’s first necessary to supplement the two-cylinder crankshaft with secondary form elements, low end and flange (see Figure 2), and to redesign the forging process.
To reduce production times and tool costs, opportunities for omitting one or more forming steps were assessed. Tests were conducted to determine whether the staged progression must be forged in four steps (comparable to the two-cylinder crankshaft without secondary form elements), or if it’s feasible to scale back to a three-stage forging process. Increased tool-loads due to the omission of one forming step can have negative effects on tool wear, thus can reducing tool life.
Regarding the design of the staged sequence for a two-cylinder crankshaft with secondary form elements, marginal conditions must be considered just as for the two-cylinder crankshaft without secondary form elements. The marginal conditions might be respective presses (maximum ram force and space requirements) as well as fold-free and free-form crack formation.
Comparison of three- and four-stage sequence
The three- and four-stage sequences were designed with the Finite Element Analysis (FEA)-based simulation software Forge 2009. Before each simulation the temperature of the part was set to 1,250°C, the tool-temperature to 250°C and the forming velocity to 25 mm/s. Subsequent evaluation of the material flow was conducted with regard to forming force, deformation degree, pressure dwell time, temperature distribution within the part, and the expected tool wear. The aim was a comparison of both staged sequences.
In the intermediate stages of the four-stage forging sequence, the forming forces at the end of the forming are similar or higher than those in the three-stage sequence. Since the majority of the required deformation energy is introduced during the first three forming steps, the final forming step needs considerably less forming force (see Figure 3)
Regarding the forming force, the analysis showed an estimated 40% higher forming force in the three-stage forming sequence compared to the four-stage forging sequence. The predominant forming of the four-stage forging sequence within the first three forming steps is illustrated in the comparison of deformation degrees (see Figure 4).
Due to the extended forming path in the last forming step, the contact time of tool and work piece in the three-stage forming sequence is considerably longer than in the four-stage sequence. In particulary, the difference occurs in the area around the main bearing and the low-end bearing, where contact times are between 1.0 and 1.7 seconds for the three-stage forging sequence, and between 0.7 to 1.0 second for the four-stage forming sequences. With the three-stage forging sequence, the gravure area of the crank web is not filled before the end of the forming process. Hence, the contact period in this area is short, while the four-stage forming sequence shows longer contact times between 1.0 s and 1.3 seconds (see Figure 5).
In the three-stage forming sequence, the extended contact times of crankshaft and base tools cause increased cooling in the area around the main bearing and the low-end bearing during the last forming step. In the area of the crank web, a comparison of three- and four-stage forging sequences shows higher temperatures for the three-stage forging sequence due to shorter contact times of work piece and tool (see Figure 6).
Due to the increased forming force, tool wear for the three-stage forging sequence is considerably higher than for the four-stage sequence. It is particularly notable in the area around the main bearing and the low-end bearing (see Figure 7). This is due to increased cooling of the part due to extended contact times. This increased locally the flow stress, and hence heightened tribological load, between the parts and the tool.
Conclusion
Based on the deliverables, it is evident, that both staged progressions are feasible since critical parameter levels, like the deformation degree φ = 4 are not exceeded. Due to a lower forming force and reduced tool wear, a comparison of FEA-results indicated benefits from the four-stage forging sequence. In order to realize the three-stage sequence the re-design of the second intermediate stage might be necessary in an additional loop. To reduce the forming force within the three-stage forging sequence, the material distribution for the second intermediate stage should be less around the main bearing and the low end bearing and deepen in the crank web. This could reduce the contact time around the main bearing and the low-end bearing and hence the cooling effect. In addition, an increased forming velocity (at present 25 mm/s) can accelerate the forming, shorten the contact time and thus reduce the effort for the realization of the final forming stage of the three-stage forging sequence.
Summary and outlook
In continuing research it will be necessary to explore possible applications of cross wedge rolling for the production of the first pre-form. For the two-cylinder crankshaft with secondary form elements, the first pre-form can be realized with mass concentrations in different locations. Based on this, the design of the cross wedge rolling process will be adjusted to determine the potential for rolling with multiple wedges.
The authors are affiliated with the Institute of Integrated Production Hannover (IPH), in Hanover, Germany; visit www.iph-hannover.de.
Dipl.-Ing. Matthias Meyer studied mechanical engineering at the Leibniz University of Hanover. Since June 2008 he has worked as scientific assistant at the IPH .
Dipl.-Ing. (FH) Michael Lücke studied mechanical engineering at the University of Applied Science Stralsund. Since July 2007 he has worked as scientific assistant at the IPH.
Dr.-Ing. Dipl.-Oec. Rouven Nickel studied economics, focusing on production management, manufacturing technology and performance measurement at the Leibniz Universitt Hannover. Subsequently, he worked as research associate at the Institute of Production Systems and Logistics (IFA). Since 2007 he has been the managing director of the IPH. In 2008 he received his doctorate in mechanical engineering at the Universitt Bremen.
Prof. Dr.-Ing. Bernd-Arno Behrens studied mechanical engineering at the University of Hanover and, subsequently, worked as research associate at the Institute of Metal Forming and Metal-Forming Machines (IFUM) at the Leibniz Universitt Hannover. After receiving his doctorate in mechanical engineering he headed the Department of Application Technology at Salzgitter AG, Salzgitter, Germany. Since 2003 he has headed the IFUM at the Leibniz Universität Hannover, and in 2005 became a member of the management board of the IPH.
The authors express their thanks to the German Research Foundation (DFGDFGDFG) for its financial support of the SFSFB 489 project described here.
|
REFERENCES [Bro99] Bro, G.: Entwicklung eines Verfahrens zum Przisionsschmieden von PKWKW-Pleueln. Dissertation, Universitt Hannover, Fortschritt-Berichte VDI, Reihe 2, Nr. 508, VDI-Verlag, Dsseldorf 1999. [Doe07] D Doege, E.; Behrens, B.-A.: Handbuch Umformtechnik – Grundlagen, Technologien, Maschinen. Springer-Verlag, Berlin Heidelberg 2007. [Mue08] M Mller, S.; Mller, K.: Parameterstudieeines mehrdirektionalwirkenden Werkzeugs zum gratlosen Przisionsschmieden einer Zweizylinderkurbelwelle. In: STAHL, Verlag Stahleisen, o. Jg. (2008), H. 3, S.38-39. |

